Announcing Anyvite Simple Ticketing

Since we launched Anyvite back in July of 2008, we’ve consistently received requests to incorporate some sort of ticketing or money collection functionality into Anyvite. These suggestions made obvious sense to us, since events and ticketing go hand in hand, but for one reason or another, we were never able to offer an integrated ticketing service.

With the new year, we resolved to change all of that. Over the past month, we’ve been working to implement the ability to receive money from your guests and issue tickets to events that you’re hosting. As with all things Anyvite, our goal was to make this process as simple and straightforward as possible, so we’re happy to announce the release of “Anyvite Simple Ticketing”, the easiest way to create and sell tickets to your events.

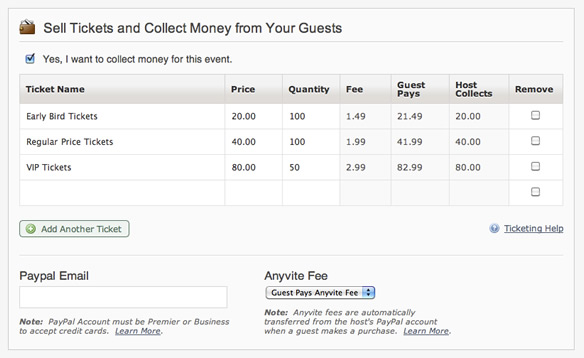
It’s incredibly easy to get started. Simply begin by creating an invitation as always, and once you reach the step where you’re entering your event details, you’ll notice a new box which says “Sell Tickets and Collect Money from Your Guests”. Click the checkbox there to enable ticketing, fill out the ticket information and add in your PayPal account.

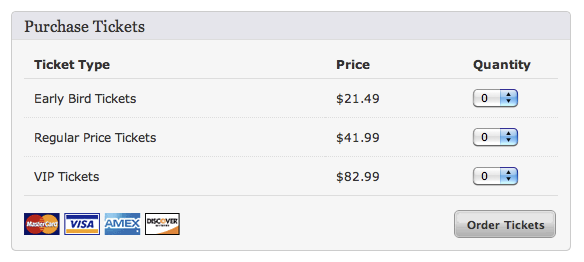
That’s all there is to it! You can then send the invitation to guests or mark it as public and share the URL via social media, and guests will be able to purchase tickets right from the invitation page. PDF tickets are automatically generated for each order and sent via email.

Anyvite collects a fee per ticket at a rate of $0.99 + 2.5% of the ticket price, with a maximum fee per ticket of $9.99. There is no initial fee to get started, and the Anyvite service fee is automatically deducted when an order is placed, so there is no additional work for the host or billing after the fact.

We’re really excited about this new offering and the potential it offers to event hosts using Anyvite for their invitations. You can find out more by reading the Anyvite Ticketing Guide, and as always, we’d love to hear your thoughts on “Anyvite Simple Ticketing”.

An Additional Option for Removing Ads from Anyvite

It has now been 32 hours since we rolled out Anyvite Plus and a single banner ad for free invitations. Overall the response that we’ve received has been a positive one, but there have been some edge cases which the new pricing structure caused problems for. Specifically event organizers who create a lot of small events and would prefer not to have advertising shown on their invitations, but don’t require the increased guest list size or additional customization features. The volume of invitations that they create would result in a significant expenditure over the course of a year, so in order to make that a bit more palpable, we’ve just rolled out an additional pricing option that only removes the advertising from your invitation for the significantly reduced price of $3.

As always, we’d love to hear your thoughts and concerns with this new pricing option, as well as all of the other changes we’ve made in the past few days.

Exciting Updates and Introducing Anyvite Plus

For the past two years, Anyvite has been the easiest way to create and send invitations online for thousands of people. Over the past few months, we’ve seen a steady increase in new people discovering just how easy it is to send invitations with Anyvite, which has introduced its share of new challenges for the service. In order to continue offering the same level of functionality and reliability that Anyvite has become known for, we’re going to be making a few improvements in the coming days, which we’d like to share with you.

We’ve noticed two main problems that we feel need to be addressed in order to continue providing a great service.

  1. As with any increase in visitors to a website, the servers which power the service take a beating, which we’ve seen evidence of in recent months with slower page loads and sporadic periods of downtime.

  2. Some individuals have started taking advantage of the 1,000 guest list limit to mass email large groups of people for their own personal gain, resulting in email delivery problems for all users across the board. While we understand that occasionally some events are misinterpreted by end users as spam, steps must still be taken to limit these types of events in the future.

To deal with these issues, we’ve decided to take the current free service and break it into two tiers, Anyvite Basic and Anyvite Plus.

Anyvite Basic will continue as the free service you know and love. To help with the cost of servers, we’re introducing advertising on the main invitation page, and to limit both spam and the overall effect on system performance, we’re limiting new invitations to a maximum of 250 guests. You can take a look at a sample Anyvite Basic invitation here: http://anyvite.com/events/home/nigtxyioru

While Anyvite Basic is suited for most events, we realize that there are some event organizers who routinely invite more than 250 guests and prefer invitations without advertising. For them, we’ve created Anyvite Plus, which features advertising free invitations and an increased guest list cap of 1500 people (which is 50% larger than the current Anyvite offering). In addition, we’re also introducing significantly enhanced capabilities for customizing the look and feel of your invitations, including changing fonts, colors, styles, and even allowing the use of custom CSS. You can get all of these new features and functionality for the low price of $10 per event.

We’re really excited about Anyvite Plus because it gives us the opportunity to release great features, like enhanced customization options, to users who can really take advantage of them. It also gives power users a way to contribute to Anyvite, so we can continue to provide and improve upon the service you know and love!

These changes will be going into effect for all newly created events starting on November 1st, 2010. Everyone should start seeing improvements in page load speed and less downtime almost immediately, and a higher percentage of emails being delivered directly to recipients inboxes as time goes on. We’d love to hear your feedback on these changes, so please contact us at any point with your thoughts. Thanks and happy holidays!

UPDATE: We’ve also added an additional option to only remove the advertising, without an increase in the guest list cap or additional customization. You can read more about that here: http://anyvite.com/blog/2010/11/an-additional-option-for-removing-ads-from-anyvite/

New Anyvite Potluck Feature for the Holidays!

Thanksgiving Table

With the holidays rapidly approaching, the number of potluck type of events organized with Anyvite will increase dramatically.  While it is possible to manage these type of events using the description field and comment board, it’s much much easier to have built in functionality to handle the “who’s bringing what” question.  In response to this, we’ve developed a “Potluck” feature on Anyvite for hosts to specify and manage the items which they would like guests to bring to an event.

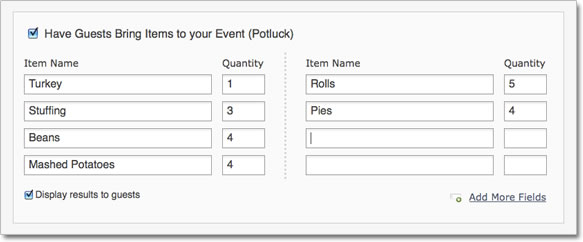
Next time you’re creating an invitation where you need guests to bring different items, simply enable the Potluck feature on the “Edit Details Page” by clicking the checkbox next to “Have Guests Bring Items to your Event (Potluck)”.  Then, fill in the items that you would like guests to bring and how many of each you need.  Finally, decide if you’d like your guests to be able to see who is bringing each item, or if you’d just like to restrict that view only to the host of the event.

Add Potluck Functionality

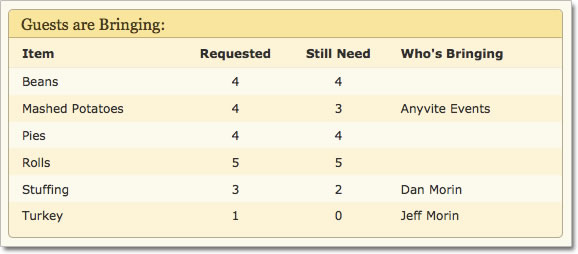
Once you save and send that invitation, anyone who RSVPs will have the option to select an item to bring to the event.  The summary table will display all of the items available to bring, how many are needed, how many are still remaining, and who is bringing each item.  If you would like to print this information out, simply export the guest list and the potluck information will be included with the guest’s name and RSVP type.  Hosts are able to change or remove the item that guests are bringing by using the “Change RSVP” link under the name of the guest (or if profile pictures are disabled, clicking the guest’s name).

View Potluck Functionality

For now, we’re restricting who can select an item to only guests who RSVP “Yes” to an event, for the obvious reason that you don’t want a guest who RSVPs “Maybe” to be responsible for a crucial item and then not show up.  If you feel differently about this, please contact us and let us know what your ideal solution would be.

Keep an eye out for many more exciting additions and updates to Anyvite!  Also, please remember to switch over your Groups to Contact Lists before the end of the month!

Manage Guests and the End of Groups

Many of you have been asking for a better way to manage an invitation’s guest list, and rightfully so.  The old “Invite Guests” page tried to be both the place to invite new guests as well as manage the existing guest list.  In theory, it was a nice idea but it never worked very well since an invitation’s guest list and the host’s address book don’t always completely overlap.

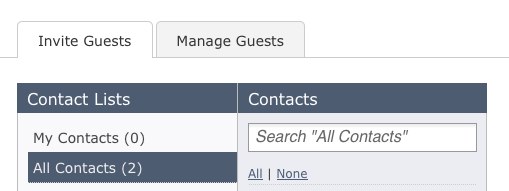
Today we launched a new version of the site which includes an updated “Invite Guests” page and a brand new “Manage Guests” page as well.  You can access both by going to the “Invite Guests” page as you always have and then look for the tabs on the top to switch over to the “Manage Guests” page.

Manage Guests Tabs

The new “Invite Guests” page was redesigned to have the same look and feel as the address book, and now supports your Anyvite address book contact lists so you can finally invite guests that way!

The “Manage Guests” page is brand new and adds two highly requested features to Anyvite: removing any guest from the invitation regardless of if they have viewed it or not, and the ability to resend the invitation to selected guests.

As we add features and functionality to Anyvite, we also like to review the current state of the service and see what we can do to make it simpler.  The original idea behind the Anyvite groups functionality was a grand one involving shared contact lists, but ended up not being developed to its full potential for a multitude of reasons.  Ultimately, groups worked okay for some users, but weren’t a great solution for anyone.  For this reason, we’ve decided to phase out groups and replace them with the newly completed contact lists.

To make the transition easy, we’ve already converted each group to a contact list for each group admin.  You should see them listed under contact lists in your address book.  If any group members want to create a contact list based on a group, there is a link on the main group page that will convert it for you.  We’re planning to leave this in place until November 1st at which point we’ll fully remove the rest of the groups functionality.  Please note that once converted, the resulting contact list isn’t shared between users anymore, so a change to one won’t affect any other contact list.

We’re excited about the new guest list management features and hope it makes your Anyvite experience that much better!  If you have any questions, feel free to contact us. And remember, Halloween is on a Saturday this year, so start making plans with our free Halloween Invitations.

Anyvite Premium Invitation Sites

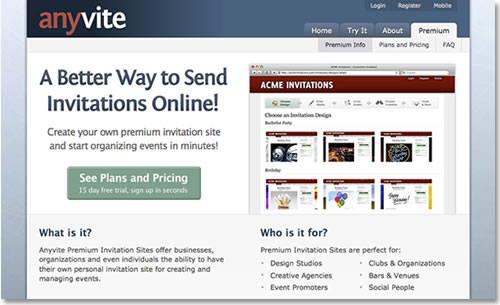
Over the past few months, we’ve been working on some exciting new projects, one of which we launched last month. Today, we’re happy to announce the release of another of those projects: Anyvite Premium Invitation Sites.

Anyvite Premium Invitation Sites

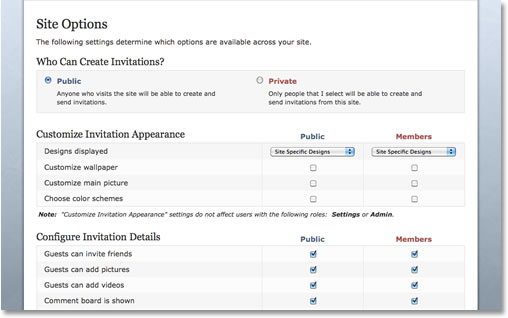
Anyvite Premium Invitation Sites allow businesses, organizations, clubs and even individuals to have their own fully customized site dedicated to organizing events under their own brand. Sites are able to be configured as either public (anyone can create a branded invitation) or private (you designate who can organize events), and consist of a whole array of options which can be toggled or disabled at will.

Premium Invitation Site Options

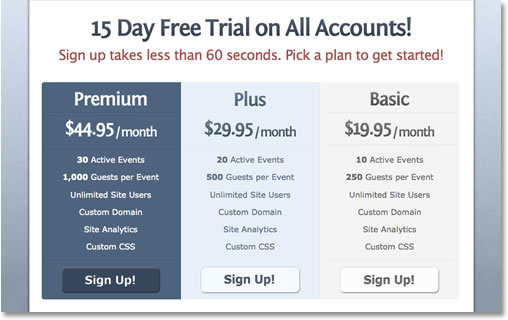
Getting started is as easy as selecting a plan, choosing a site name, and adding in your billing info. Every plan comes with a 15 day free trial, so if you’re not satisfied with the experience, simply cancel your plan before the 15 days are up and you won’t be charged a thing. As an added incentive, we’re providing our basic site design customization service for free to any new customers. Simply sign up for a site, and then send us an email with your new site’s URL, as well as information about how you would like to customize your site.

Premium Site Plans and Pricing

Premium Sites are perfectly suited for existing businesses which conduct a large number of events on a regular basis and are looking to add another offering to their existing services, or for groups and organizations looking to further their brand by utilizing events as means to connect with existing or future customers.

If you have any questions about Anyvite Premium Invitation Sites or if our current packages don’t fit your needs, please contact us and we’ll get things sorted out for you.

New Daily Invitation Activity Emails

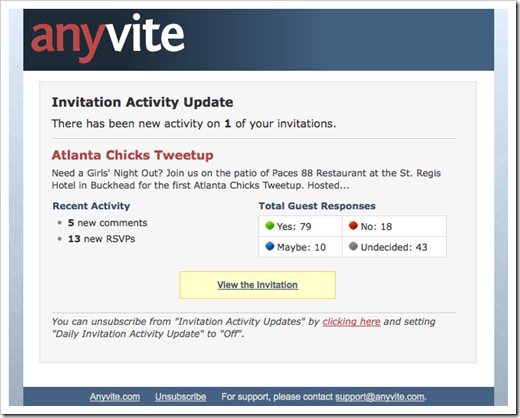
We’ve just pushed out new functionality today for updating guests on activity to invitations which they’ve RSVPed “Yes” or “Maybe” to.  In the past, new comments and RSVPs have slipped under the radar for most guests because notifications were not in place to alert them to new activity.  Now, if there is any activity on one of your invitations, you’ll receive a daily email to notify you of new changes, and allow you to view RSVPs and respond to comments on the invitation itself.

Picture 83

Additionally, if someone responds to a comment that you’ve made on the message board, you’ll receive an email right away telling you that, and allowing you to respond back to them in almost real time.  We hope that this facilitates better and more lively discussions on the message board!

As always, we’d love to hear your thoughts on this new update to Anyvite, as well as anything else which may be on your mind!

10 Tips for Getting the Most out of Your Anyvite Online Invitation

Thousands of people use online invitations every day to invite guests to events.  While the base functionality is pretty straightforward, most people fail to take advantage of the nuances that really make online invitations worth using.  Here are 10 tips on how to get the most out of your Anyvite online invitations:

1.  Personalize It – While many of the pre-made themes are excellent to use, personalizing an invitation with a funny or embarrassing picture of the birthday boy/girl really helps guests connect with what’s happening and make it more likely they’ll RSVP yes.  Additionally, you can add in supporting pictures and video relating to the theme or person that the event is centered around, or showcase pictures from the previous year’s event.

2.  Mobile Is Better – Instead of relying solely on the computer for managing your invitation and event, leverage the mobile capabilities of Anyvite to create invitations and advise your guests on the go!  Anyvite has a mobile version of the main site which you can access through your phone and text message commands which you can use to send update messages to all of your guests, even if you don’t have the Internet on your phone.

3.  Cap the Number of Guests – Scarcity facilitates action.  Instituting a cap on the number of guests who can attend an event creates the initial panic that you might be left out, resulting in more guests RSVPing faster than if the invitation is left open to unlimited number of people.  You can always raise the cap if you hit it prematurely and need to allow more guests in.

4.  Time When You Send Out the Invitation – It’s a fact of life that people get a lot of email, so if you happen to send out an invitation on Friday night at 8pm, then odds are it won’t be read by a majority of your guests until the following Monday at work…if it hasn’t been buried under every other email sent over the weekend.  Plan on sending out your invitation when people are at their desks and actively reading email.  This means sending on a weekday morning when people are just getting into the office or after lunch when they’re taking a break before afternoon meetings.  You’ll end up with a higher number of RSVPs and faster response time than sending during off hours or on a weekend.

5.  Toggle Guest RSVPs to “Yes” – Guests love to see who else is attending and will be more likely to RSVP “Yes” if other people have already.  If you’ve discussed the event and received verbal responses from some guests, then use the “Change RSVP” functionality to update their RSVPs to “Yes” before sending out the invitation.

6.  Start a Discussion on the Comment Board – Immediately after sending out your invitation, you should leave a message on the comment board in order to get a discussion going.  Unlike comments on blogs, guests usually don’t want to be the first one to leave a comment on an invitation, so having the event creator kick things off is the best way to boost activity on your invitation, and ultimately increase RSVPs from invited guests.

7.  Update Your Guests To Keep Them Engaged – Day to day life can be extremely busy and we sometimes forget even the most important events.  You should send notes from time to time to guests to keep them updated on the progress of the event and/or ask questions if the need arises.  This keeps the guests who have already RSVPed engaged and thinking about the event, and it prompts guests who have not yet responded to revisit the invitation and update their RSVP accordingly.

8.  Promote, Promote, Promote! - If you’re throwing a large party or event where the goal is to get as many people as possible to attend, then you’re going to need to do a little (or a lot) of promotion.  Even the largest guest list can be improved by using the network effect, and one of the best ways to do this to post it to the most popular and highly visible social networks out there, mainly Facebook and Twitter, using the sharing buttons on your invitation.  This will result in your event being visible to that guest’s network of friends, who can Sign Up and RSVP, repost it themselves, and the effect continues.

9.  Guests are Always Fashionably Late -  Almost without fail, people will be late on purpose.  Guests never want to be the first ones to arrive, so take this into account when determining a start time for your event.  If you want people to arrive for an 8:30pm party, then have the start time be 8pm to compensate accordingly.  Additionally, having a small group of friends show up a little beforehand so that there is a small crowd already when the first guests arrive helps to get the party started.

10.  Send a Thank You Note Afterwards -  You can send a Thank You note on Anyvite to guests who attended by clicking “Contact Guests” on your invitation and entering a message to say thanks for attending, and that you’re looking forward to seeing them again at your next event.  A little gratitude can go a long way!

Obviously, these tips do not apply to all situations, but hopefully at least one will help you the next time you’re looking to throw an event using Anyvite.  Please leave any great tips that you have in the comments!

A new dashboard, Hosted By field, and much more!

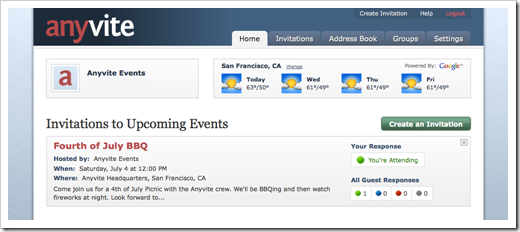
We’ve released another significant update to the site which should fix a lot of the quirks and bugs that you may have been experiencing recently.  In addition, we’ve made some strides in updating the dashboard to be a bit cleaner and less cluttered, as well as added in the ability to enter in a “hosted by” name, rather than just using the name of your Anyvite account.  Check it out and let us know your thoughts!

 Picture 44

We hope everyone had a great Memorial Day Weekend and are looking forward to a summer filled with BBQs, picnics, parties and fun!

A New Progress Bar when Creating Invitations

We’ve just added a new feature to the site which lets you track where you are in the process of creating an invitation.  We had received some feedback from users who thought that some parts of the process were a bit ambiguous, so this should hopefully help to alleviate that.  

Picture 31

It works basically as expected.  You can always go backwards to steps that you’ve already completed or skipped, but have to perform the necessary actions to move forward in the process.   We’d love to hear your thoughts on whether you think it makes creating an invitation easier or harder, so please let us know!

Next Page »

Older Posts »